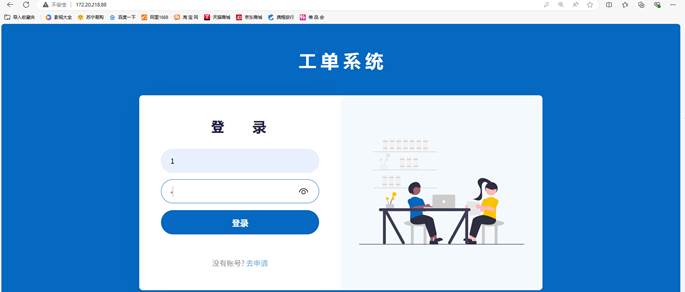
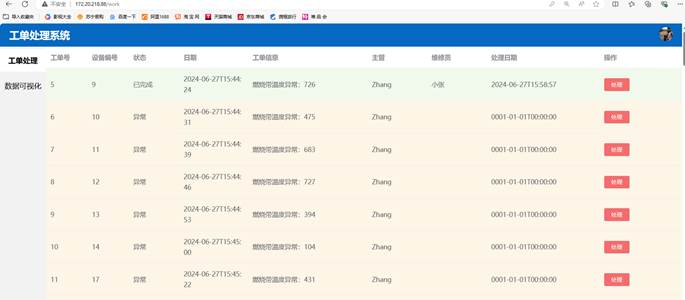
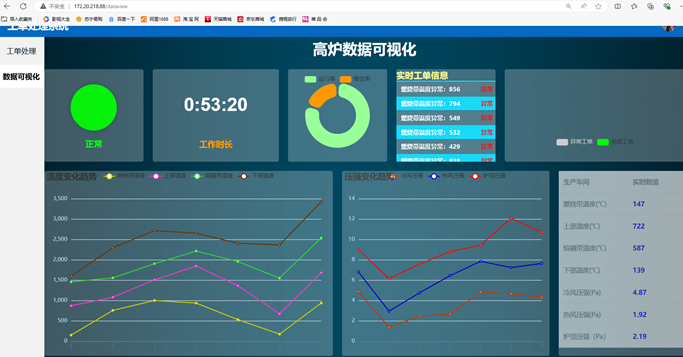
数据采集与可视化监控工单处理系统——炼铁高炉 项目概述 随着工业自动化和数字化的不断发展,对炼铁高炉的生产状态进行实时监控变得尤为重要。本项目旨在通过高效的数据采集与可视化监控工单处理系统,实时监测高炉内的温度、压力和运行状态。该系统能够及时生成工单,快速反馈给维保人员,确保对异常情况的快速响应和处理。通过精确的数据分析与可视化展示,提升生产效率,降低故障率,最终实现炼铁高炉的安全、稳定与高效运行。
项目截图
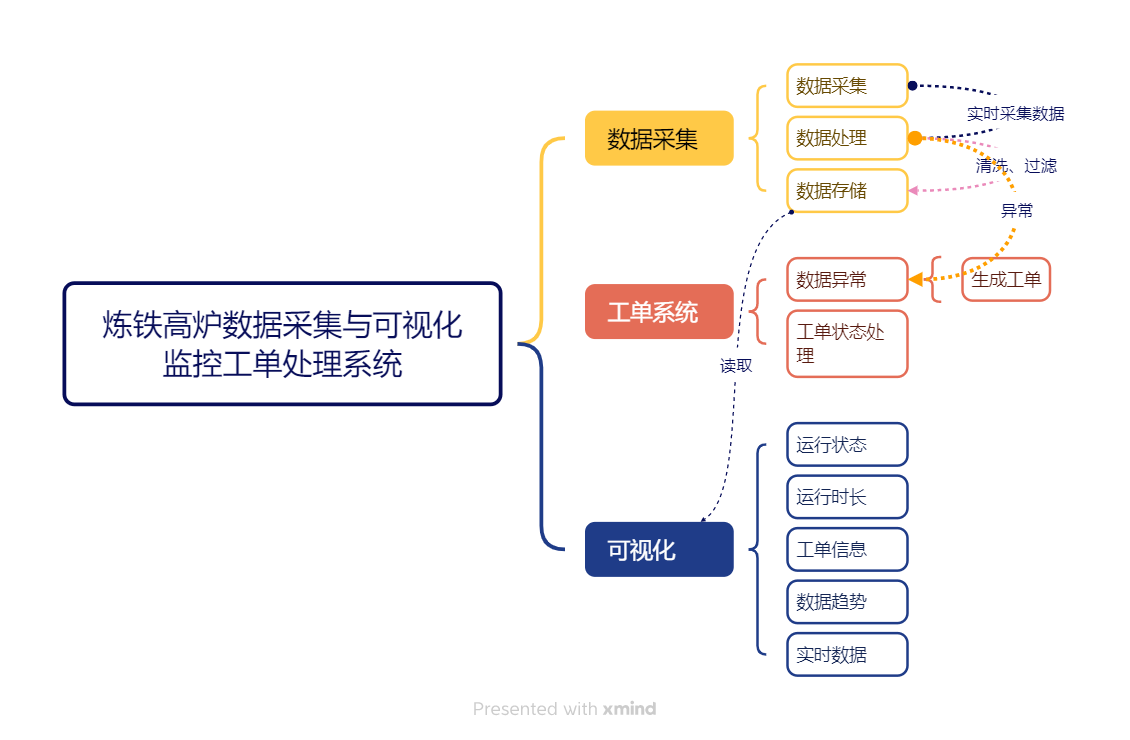
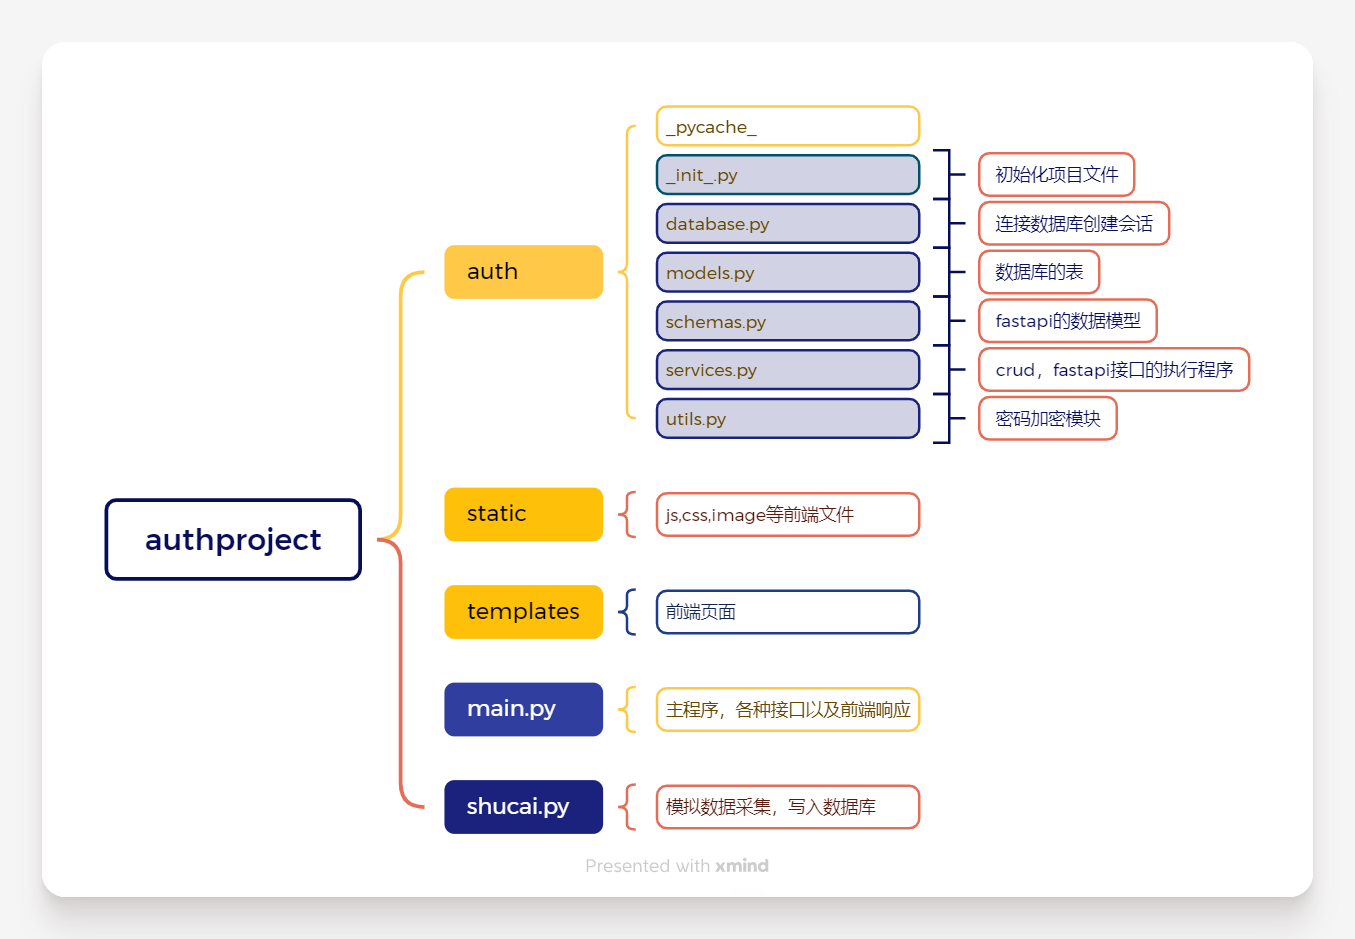
项目框架
项目文件
项目前准备
python3.8以上环境
pycharm编辑器
mysql数据库
导入所需的库[^所需库]
数据库准备 成功安装mysql数据库之后,导入SQLAlchemy库,并对数据库创建连接。
1 2 3 4 5 6 7 8 9 10 11 12 from sqlalchemy import create_enginefrom sqlalchemy.ext.declarative import declarative_basefrom sqlalchemy.orm import sessionmaker"mysql+pymysql://root:123456@localhost/produce" ) False , autoflush=False , bind=engine)
随后在main.py里创建一个依赖项
1
2
3
4
5
6
def get_db ():try :yield dbfinally :
数据模型 高炉数据模型
1
2
3
4
5
6
7
8
9
10
11
12
13
class Devices (BaseModel ):id : int int int int int int float float float str int
工单数据模型
1
2
3
4
5
6
7
8
9
class Abnormals (BaseModel ):id : int int str str Optional [str ] = None Optional [str ] = None Optional [datetime] = None
用户信息模型
1 2 3 4 5 6 7 8 9 10 11 12 13 14 15 16 class UserBase (BaseModel ):str Optional [str ] = None Optional [str ] = None class UserCreate (UserBase ):str class User (UserBase ):class Config :True
响应模型-令牌
1
2
3
class Token (BaseModel ):str str
可视化数据模型
1
2
3
4
5
6
7
8
9
10
class Devices_dataView (BaseModel ):int int int int int float float float
数据库数据模型 用户表
1
2
3
4
5
6
7
class UserInDB (Base ): "user" id = Column(Integer, primary_key=True , index=True )'username' , String(50 ))'full_name' , String(50 ))'email' , String(100 ))'hashed_password' , String(64 ))
设备数据表
1
2
3
4
5
6
7
8
9
10
11
12
13
14
15
16
class Devices (Base ):"device" id = Column(Integer, primary_key=True , index=True )8 ))"Abnormals" , back_populates="device_back" )
工单表
1
2
3
4
5
6
7
8
9
10
11
12
13
class Abnormals (Base ):"abnormals" id = Column(Integer, primary_key=True , index=True )"device.id" ))"Devices" , back_populates="abnormalities" )8 )) 255 )) 16 )) 16 )) None )
项目功能 数据采集 使用mqtt传输协议获取实时数据。
存储方法:
1
2
3
4
5
6
7
8
9
10
11
12
13
14
15
16
17
18
def create_device (db: Session, device: schemas.Devices ):return db_device
创建工单 存储数据时对数据进行检查,异常时应该建立对应的工单 ,
1 2 3 4 5 6 7 8 9 10 11 12 13 14 15 def create_abnormal (db: Session, device: schemas.Devices, abnormal: schemas.Abnormals ):id ,return db_abnormal
用户注册 注册方法
1 2 3 4 5 6 7 8 9 10 11 12 13 14 15 16 def create_user (db: Session, user: schemas.UserCreate ):return db_user
密码加密方法放在serices.py里面
fastapi接口
1 2 3 4 5 6 7 8 9 10 11 @app.post("/user/create/" , response_model=schemas.User async def create_user (user: schemas.UserCreate, db: Session = Depends(get_db ) ):if dbuser: raise HTTPException("用户名已存在" ,return services.create_user(db, user)
用户登录接口 1 2 3 4 5 6 7 8 9 10 11 12 13 14 15 16 17 18 19 @app.post("/user-login" , response_model=schemas.Token async def login ( form: OAuth2PasswordRequestForm = Depends( db: Session = Depends(get_db ), print (user)if not user:raise HTTPException("用户名或密码无效" ,"WWW-Authenticate" : "Bearer" },"username" : user.username}) "access_token" , value=access_token, httponly=True , max_age=3600 ) return {"access_token" : access_token, "token_type" : "bearer" }
登录状态依赖函数 1 2 3 4 5 6 7 8 9 10 11 12 13 14 15 16 17 18 19 20 21 22 23 24 25 26 27 28 29 30 31 32 33 34 35 36 async def check_status (token: str = Depends(oauth2_scheme ), db: Session = Depends(get_db ) ):"无效的用户凭据" ,"WWW-Authenticate" : "Bearer" },"登录状态已过期" ,"WWW-Authenticate" : "Bearer" },try :str = services.extract_token(token)['username' ]'exp' ]if username is None :raise invalid_exceptionif exp is not None :""" 校验token是否过期 """ 'Asia/Shanghai' )float (exp), beijing_timezone)if exp_datetime < current_time:raise expired_exceptionexcept JWTError:raise invalid_exceptionif user is None :raise invalid_exceptionelse :return user
数据查询 数据查询可以孪生可视化的各种功能,以下是查询工单的一个例子,就不一一例举了。
1 2 def get_abnormals (db: Session, skip: int = 0 , limit: int = 100 ):return db.query(models.Abnormals).offset(skip).limit(limit).all ()
前端 前端使用了element ui vue[^element ui]框架,弹窗使用了国外的一个弹窗组件,统计图使用了Apache Echarts[^Apache]
下面是前端几个主要的js代码,更多请下载项目研究 登录js
1 2 3 4 5 6 7 8 9 10 11 12 13 14 15 16 17 18 19 20 21 22 23 24 25 26 27 28 29 30 31 32 33 34 35 36 37 38 39 40 41 42 43 44 45 46 47 48 49 50 51 52 53 54 55 56 57 58 59 60 61 62 63 64 65 66 67 68 69 70 71 72 73 74 75 76 77 78 79 80 81 document .getElementById ('loginForm' ).addEventListener ('submit' , function (event ) {preventDefault ();var username = document .getElementById ('username' ).value ;var password = document .getElementById ('password' ).value ;fetch ('/user-login' , {method : 'POST' ,headers : {'Content-Type' : 'application/x-www-form-urlencoded' body : `username=${encodeURIComponent (username)} &password=${encodeURIComponent (password)} ` then (response =>if (!response.ok ) {if (response.status === 401 ) {return response.json ().then (data =>loginno (data.detail );throw new Error ('Unauthorized' );else {throw new Error ('Network response was not ok' );return response.json ();then (data =>document .cookie = `access_token=${data.access_token} ; max-age=3600; path=/` ;loginok ();catch (error =>console .error ('Error:' , error);function loginok (let timerInterval;Swal .fire ({title : "登录成功!" ,timer : 1000 ,timerProgressBar : true ,didOpen : () => {Swal .showLoading ();const timer = Swal .getPopup ().querySelector ("b" );setInterval (() => {textContent = `${Swal.getTimerLeft()} ` ;100 );willClose : () => {clearInterval (timerInterval);then ((result ) => {if (result.dismiss === Swal .DismissReason .timer ) {window .location .href = '/work' ;function loginno (message ) {let timerInterval;Swal .fire ({title : message,timer : 1000 ,timerProgressBar : false ,showConfirmButton : false ,didOpen : () => {const timer = Swal .getPopup ().querySelector ("b" );setInterval (() => {textContent = `${Swal.getTimerLeft()} ` ;100 );willClose : () => {clearInterval (timerInterval);then ((result ) => {if (result.dismiss === Swal .DismissReason .timer ) {
检查登录状态
1 2 3 4 5 6 7 8 9 10 11 12 13 14 15 16 17 18 19 20 21 22 23 24 25 26 27 28 29 30 31 32 33 34 35 36 37 38 39 40 41 42 43 function checkCookie (var cookieValue = document .cookie .replace (/(?:(?:^|.*;\s*)access_token\s*\=\s*([^;]*).*$)|^.*$/ , "$1" );if (cookieValue) {setTimeout (function (checkToken (cookieValue).then (isValid =>if (isValid) {console .log ('验证通过,显示欢迎信息' );redirectToWorkPage ();else {console .log ('验证失败' );2000 ); else {function checkToken (token ) {return fetch ('/verify_cookie' , {method : 'GET' ,headers : {'Authorization' : `Bearer ${token} ` then (response =>if (!response.ok ) {throw new Error ('status is not ok' );return true ; catch (error =>console .error ('There has been a problem with your fetch operation:' , error);return false ;
处理工单js代码
1 2 3 4 5 6 7 8 9 10 11 12 13 14 15 16 17 18 19 20 21 22 23 24 25 26 27 28 29 30 31 32 33 34 35 36 37 38 39 40 41 42 43 44 45 46 47 48 49 50 51 52 53 54 55 56 57 58 59 60 61 62 63 64 65 66 67 68 69 70 71 72 73 74 75 76 77 78 var Main = {data (return {tableData : [],loading : true methods : {tableRowClassName ({row, rowIndex} ) {if (row.state === "异常" ) {return 'warning-row' ;else if (row.state === "已完成" ) {return 'success-row' ;return '' ;async loadData (const abnormals = await fetchAbnormals ();this .tableData = abnormals;this .loading = false ;handleCheck (index, row ) {-->if (confirm (`确定要修改 ${row.name} 的地址吗?` )) {-->this .$set(this .tableData , index, { ...row, address : '步行街' });-->async handleEdit (index, row ) {var upData = {"id" : row.id ,"device_id" : row.device_id ,"state" : "" ,"time" : row.time ,"msg" : row.msg ,"charge" : row.charge ,"worker" : "" ,"repair_time" : "" try {const result = await editPop (upData);if (result){await this .loadData ();catch (error) {console .error ('编辑操作失败:' , error);mounted (this .loadData ();var Ctor = Vue .extend (Main );new Ctor ().$mount('#app' );async function fetchAbnormals (const url = `./abnormals/` ;return fetch (url, {method : 'GET' ,headers : {'Authorization' : `Bearer ${document .cookie.replace(/(?:(?:^|.*;\s*)access_token\s*\=\s*([^;]*).*$)|^.*$/, "$1" )} ` then (response =>if (!response.ok ) {throw new Error (`HTTP error! status: ${response.status} ` );return response.json ();catch (error =>console .error ('Error fetching abnormals:' , error);return [];
测试 业务流程逻辑图
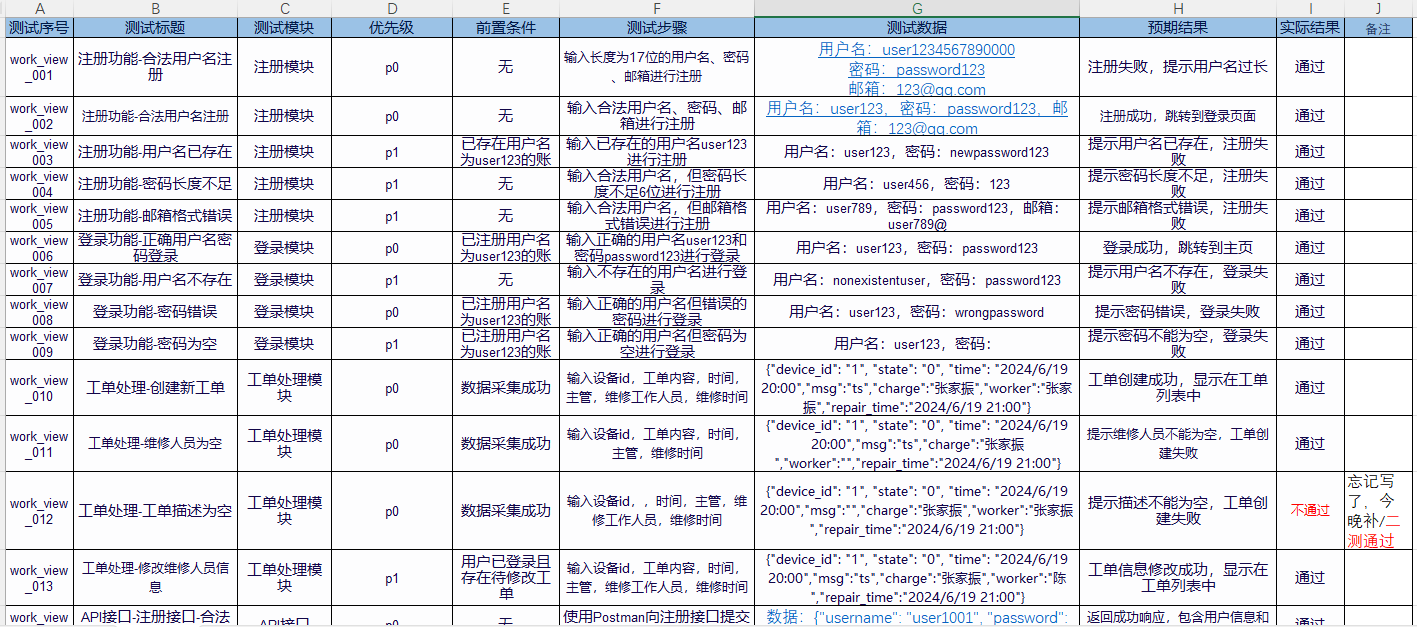
功能/接口测试用例 PS: 需求分析文档在c221机房p28电脑;张家振6/27总结报告已提交
总结 以上就是数据采集与可视化监控工单处理系统——炼铁高炉项目的主要内容,还有一些没有写出来的主要是因为重复性较高的,写出来没有什么意义。如果有需要的话,可以去我的github上点个小星星下载到本地运行,谢谢。
致谢 最后,非常感谢您的看到最后!
仓库地址:wechatid/WorkOdrderSystem: 数据可视化与工单处理系统-炼铁高炉 (github.com)
[^所需库]: WorkOdrderSystem/requirements.txt at main · wechatid/WorkOdrderSystem (github.com) Apache ECharts 组件 | Element
